Sunday

High Impact Lashes from the High Street!


We girls LOVE to flutter our eye lashes and these days it's all about the false effect. Sometimes we just don't have the time to be applying lash strips yet we still want an impressive flutter. I found a Topshop voucher from Christmas that I was sure I lost (score!) so I decided to spend some of it on mascara as I was only surviving on dredges. 

Topshop are stocking a new cosmetics brand - Sisters of the New Moon - and the packaging is so pretty, so I was drawn in immediately. I picked up the dreamy pastel mascara box; Lash Catcher (in black), and proceeded to the check out. 


The wand is sturdy and the brush is smaller than brushes on mascaras that I have used recently. I found it was easy to control your application and reach corners without worrying about marking around the lash area. I loved the pigment, and after one coat you immediately have a nice curl and increased volume. The mascara has an extremely smooth texture, leaving no clumps. It spreads very easily so you really don't have to use a lot. The product is not perfumed and it's scent is quite natural.


At €15 this high street mascara isn't necessarily "cheap" but it's worth a purchase on pay day or when you have a voucher like me! It beats high-end mascaras that I have used in the past. 


Happy fluttering <3

Saturday

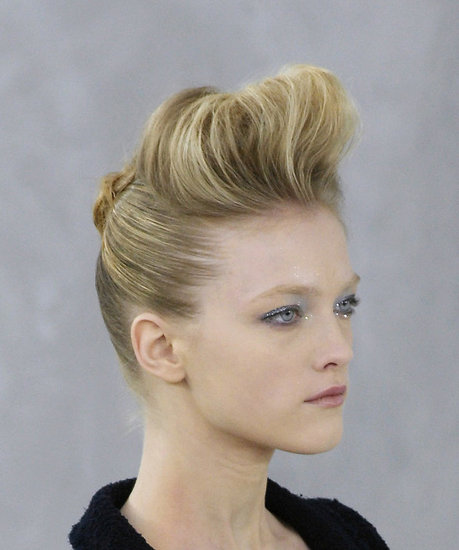
Quality Quiff


Ok so I've been embracing the quiff quite a bit recently and people have been asking how I do it, so here goes.

The best time to do a quiff is when your hair is a bit greasy and easier to handle. When your hair is only washed it can be a bit fine and fly-away so it is harder to manage.

You will need:
One head of not-so-fresh hair
Strong hair spray
A tail comb
Bobbins
Clips


Step 1 - pull forward the front section of your hair using your tail comb. The bigger the quiff you want, the more hair you should take down. Take the rest of your hair up into a pony tail. To avoid the front section being taken into the pony tail tie a separate bobbin around it or use a clip.

Step 2 - back comb the front section of your hair until you look like a crazy person! Back comb the hair underneath rather than the hair that's facing outwards.


Step 3 - twist the end of your front section into a point.


Step 4 - take the point of your front section and pull it back and position it.


Step 5 - pin your section in place, spray it and smooth it over with your hands.
Step 6 - back comb your pony tail (as you can see I am a fan of the back combing).


Step 7 - twist your pony up into a messy bun. You can use a doughnut to crate a neater look.

And VOILĂ€!

Fab hair in five minutes.

Monday

DIY: Fabulous Floral Headband


You know Spring is here once you see the floral prints creeping back into shops, and my God they are back! With both high fashion and high street brands all embracing the typical Springtime print, there is no way to avoid it. SO LOVE IT! It's fun, colourful and pretty. You don't have to go mental and wear a full floral gown, why not try jeans, a cute t shirt and a floral headband? Floral headbands have been massive recently, no doubt due to the influence of Lana Del Rey, but who are we to complain? they are gorgeous!


They are available in loads of places in town from a range of prices, but to go for the big full on fabulous floral headband at a low price your going to have to do some DIY!

What you'll need is:

Individual bunches of plastic flowers. €1.50
These can be bought from all of the Pound shops on Talbot Street


Get 3/4 bunches of all your fave colours:


A strong pair of scissors:


A headband with a plait in it, this one is from Penneys for €1:


Choose from each bunch your favourite flowers, you'll need about 10 for this:


Cut the stem of the flower, all of these stems will have wire in them, so the best way is to give them a little cut and bend the stem until it snaps, leave enough stem for attaching the flower to the headband:


(all of my cut flowers:)


Line the flowers up in the order you'd like them to be on your head:


Slide the stem through the plait of the headband:


Bend over the stem once:


And continue to fold the stem over until there is no wire stem protruding:


Continue to do this until you're happy with your arrangement and the amount of flowers on the headband:


AND THAT'S IT :)


Lana Del Rey eat your heart out!! Affordable, seasonal and completely fabulous!


Jess : ) x


Sunday

Sunday Spending and Splendid Skin


Myself, Jess and our bessie Niamh decided to treat ourselves and take a trip to our favourite store - Penneys. The stock in Penneys at the moment is FAB and as always it's for nothing. After spoiling ourselves in Eddie Rockets we strolled (more like rolled) to Penney's on O'Connell Street.


Our purchase highlights included:
Metallic canvas sneakers (€7)
Canvas bow shoes (€3)
Pink dress (€7)
Tack-tastic diamontĂ© iPhone case (€5)

We also stopped off at Doc Morris Pharmacy on our way home to pick up some make-up. I needed some summer-friendly foundation. I had heard quite a bit about Rimmel's new 'Wake Me Up' foundation recently so I decided to give it a whirl. I bought the foundation in soft beige for €11.


I thought the orange packaging and curved bottle was very attractive and it really stood out from the other products on the shelves. The orange pump also distributes the perfect amount of foundation so that you are not left with any excess on your hand or brush!


I loved this foundation. The texture is light and airy and its smell is super fresh. It gives you a gorgeous dewy glow and it has an almost shimmering finish. I am a HUGE fan of "glowy" foundations. However, the glow off this foundation can give you an exaggerated shiny (sweaty) look in photographs. After I took the above photo I applied a small amount of face powder. For skin that is already oily this may not work, but it worked for my combination skin and overall I LOVED it.

Now we are going to chill and plan next weekend's purchases finding inspiration from some glossies.


Laura <3


Thursday

Ice Cream Pastels - How Tasty!


One of the most obvious trends for Spring/Summer 2012 is ice cream pastels. Fab. Strolling through Dublin's high street stores, the colours are quite unmissable. Penneys is full of unreal blouses, blazers, shoes and accessories - all embracing chalky ice cream shades. Going through my make-up I realised I had a TONNE of bright neon lipsticks. I had to transform them into ice cream yumminess to coordinate with the 7 million pastel items I had picked up on Henry Street. Simple.

All you need is a bright lipstick and a thick foundation or concealer. For this post I used Barry M in Vibrant Pink available in Boots or Superdrug for €6 and Max Factor's Pan Stick (the old reliable) available in Boots and Doc Morris pharmacies for €10.95 (and it lasts practically your whole life).


The lipstick is quite pretty untouched!


BUT this was about making it ice creamy!
Mix your chosen lipstick with your foundation and with a good lip brush (or in Ruby Fab's case a cotton bud) apply generously. I HAVE UNREAL LIPS!
This can be done with any bright/neon colour to adapt your product for this season. BANG on trend.


These looks are quite delicate - peaches, lavenders and pinks. You can go a tad further and go for greens, blues and yellows.
Happy ice-creaming!

Laura <3